Overview
You can access premade discussion guide templates or create your own Custom Templates to quickly and easily create a Remesh discussion guide. Creating a discussion guide allows you to select and send out pre-programmed content to the group as you moderate a Live session. In a Flex session, your discussion guide contains the questions your participants will answer at their own pace.
Before programming your Discussion Guide, you will need to create your Conversation. If you have not done this yet, please reference this article!
How it Works
There are five ways to program a Remesh discussion guide:
- In-Platform Discussion Guide Builder
- Premade or Custom Templates
- Uploading an Excel or Word Document File
- Paste in Text
- Duplicate, Translate or Import an Existing Discussion Guide
In this article, we’ll focus on using premade and Custom Templates. We recommend utilizing premade and custom templates if you are newer to Remesh and would like to use an existing Discussion Guide as the basis for your own. We recommend creating a Custom Template if you have a Discussion Guide that you or other individuals on your team may want to use repeatedly.
Included in this Article
- Preparing to Write your Discussion Guide
- Programming Using Templates
- Creating and Editing Custom Templates
- Frequently Asked Questions
- What's Next?
Preparing to Write your Discussion Guide
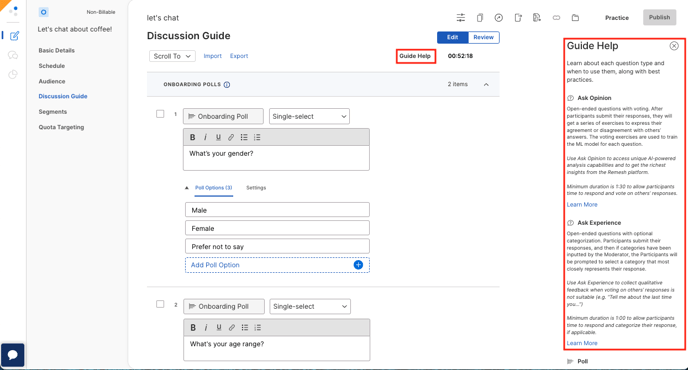
Before writing your Discussion Guide, we recommend reviewing Remesh's Question Types and our best practices.You can also find an overview in the platform by clicking "Guide Help."
If you'd like an basic introduction to crafting your research on Remesh, you can find that here!
Programming Using Templates
Navigate to your Discussion Guide, then click "Import" and "Template."

You will then see a list of your available templates. Simply click a Template to see a preview, then choose to import.

Creating and editing custom Discussion Guide Templates
Your team can create custom Discussion Guide Templates that include questions, polls, text, stimuli and pre-defined segments to help streamline your future research projects.
You can create a custom template by either using a previous Conversation or by creating a Discussion Guide from scratch within the Team folder.
To create a custom template from scratch, start programming your Discussion Guide using the Discussion Guide Builder. To save your Discussion Guide as a template:
- Click the “Save as Template” button, which appears as the floppy disk icon with an arrow.
- You’ll be prompted to name your template. By default, the name will populate as your Discussion Guide name + Template, but you can edit this name to whatever will be most helpful for your team.
- Click “Create” and your template is ready to be used by other team members!

- When creating your custom template from within the Team folder, you also have the ability to pre-program the Segments, saving your team even more time for future projects.

- Templates are easy to edit but are “locked” as a precaution to ensure you don’t accidentally make unintentional changes to a team template.
To edit a shared custom template:
- You must “unlock” the template by clicking the “Edit Template” button in the top right corner of the screen.
- The template can now be edited, including the defined Segments.

*Please note that when you make a change to a template, that change will apply to the entire team, but won’t apply to already-created Conversations. If you want to apply changes to existing Conversations, you’ll need to re-import and replace the Conversation.
Frequently Asked Questions
- Can the participants navigate to a link or video outside of Remesh?
Yes, you are able to navigate participants to webpages outside of Remesh by including a link through a Speak. However, we recommend keeping as much of the conversation as possible within Remesh in order to provide a seamless experience.
You are able to embed both videos and images within the Remesh Conversation by selecting image or video in the Discussion Guide.
What's Next?
Keep programming your Conversation by completing your Basic Details and Schedule, recruit your participants if necessary, and check out our Conversation checklist!